[00:00] — Introduction & Context
So, welcome in everyone today again. Yeah, my name is Dan Caesar. I've been the product manager for Bluehill Universal, Bluehill Central for over five years now. So, I love to take these opportunities to share some insights and hopefully you'll learn a couple things today. So, again, what do we want? What do I want to cover in this session? So the meat of it is going to be the features 1 through 10. Just some tips and tricks around things that you can set up within Bluehill that encourage and promote better data integrity in the tests that you're running.
But before I jump into those specific features, I did want to take a step back, look at the overall context of trusting your data that's getting produced by an Instron system, and look at all the different factors at play and kind of building up the foundations of trust before we get into just the software features that we'll get into in this session.
So, this is kind of a pyramid where it's going to be displaying a little bit of a hierarchy of trusted data. We're going to start with kind of the foundations. And you'll see what I mean by starting with the basics, starting with the equipment that you're purchasing, spec'ing it out to make sure that the machine itself is designed and spec'd out to meet your needs, to meet the quality of data, the reliability and accuracy that your application, your company depends on. And so this is of course what the machine is designed to do, what it's manufactured reliably to do when it's installed on site is verified to meet those performance specs, because if these don't meet your requirements or the standards that you're testing to, then everything else above this really doesn't matter. So that's kind of first and foremost — the foundation of building data that you can trust.
And then if we look at, over time, over the life of that equipment — you might have it for 30 years — that you can't just assume that its initial performance is going to be maintained without doing anything. So, of course, we know the value and the importance of taking care of your equipment, making sure that you are doing preventative maintenance, that if something needs to be replaced, that you're replacing it, that if you have service come on site to make sure that the sensors, the load cell, the extensometers that you use, the displacement transducers are all measuring as they intend, that as they should. So that trust needs to be sustained over time. And then so we have the equipment, we're confident in our hardware, we're doing a good job taking care of it.
Now it gets into some of the more complex nature of test setup and the actual performance of the test itself. And this is where a lot of risk can surface because there's so many decisions. There's so many configuration options and you introducing kind of the human into the equation of performing the test, setting things up, and that due to the nature of all the different configuration settings and all this, the decisions that need to be made, that there's risk that you might be doing something incorrectly, whether intentional or not.
Then the test is run. You're producing data. You have the settings, kind of the system is configured to do what you've designed it to do. How do we govern those settings? How do we govern the data that's being produced? To make sure that the right people who are trained to make certain decisions are the ones making those decisions and that the data that's being produced is protected and secured so that no one can accidentally overwrite it, that you can refer back to data when you need to, and that it doesn't disappear if there's some unforeseen event that unfortunately deletes things.
So data governance is certainly important, and then at the top of the pyramid is the glue that holds a lot of this together, and that the human plays an important role in everything underneath, and that we cannot automate every single last decision and activity when we're running tests on material testers. And so there's still a lot of different decisions that have to be made and where they're not made, it is a human that is doing it. So we want those humans to have the right experience to be trained accordingly, that largely a lot of the companies that we do business with have very good training programs that supplement the Instron training that we provide. They have very well-documented operating procedures that outline kind of how the equipment should be used to control the use.
So this is I guess setting the scene for all the different factors that can play into getting to a point where you 100% trust the data that's coming out of your system. And what we're going to be focused on today is this middle one, test setup and execution. And so of course I am the software product manager for Bluehill Universal Software. So that's where we are going to focus on, some specific software features specifically in kind of the test configuration. But I do want to do a little bit of a shout out that in a couple of months, we're going to be doing a subsequent session again focused on software capabilities, but in kind of one leg up on this ladder in data governance. So if that's something that you're interested in, make sure you keep an eye out or an ear out for that session.
Before I go to the first feature, though, I want to make sure that I didn't lose you in that first section, that we still have a little bit of engagement to start this session off. So, I want to put up a poll. So, Nick, if you could put up that poll for everyone to see that this is a question that we have about our Bluehill help system. So, you should be seeing a question that says, "What content from Bluehill's help system do you visit the most?" Is it your test control, setting up ramps? Is it setting up your transducers and measurements that your sensors are capturing during the test? Is it figuring out what calculation you need or exports? Just general terminology and glossary? Or maybe you never visit the help, but if you could just quickly say, hey, this is the one I visit the most, it'll help us get a little bit of an understanding of where people are going to for the help system and also potentially how we can make that inherently simpler so you don't have to go to the help in the first place.
So I would say just give it another 10 seconds or so, Nick. And I'm not sure if you can see the response rates, but yeah, I I think there's a couple more trickling in, but we're probably capturing most of the responses here, so I'm going to wrap it up. Perfect.
OK. So, let's jump to the first feature. So, hopefully we're going to go through 10 of these. I definitely expect you to not know about a few of them.
[08:41] — Tips 1 and 2: Drift Check & Periodic Calibration
Maybe you will know about some, but the first one we are going to start with is called drift check. And so this dialogue that I'm showing is for your load cell. If you go to the transducer settings by clicking the icon, there's a tab that's called checks, and that will allow you to do two different things. One is periodic calibration, which I'll get to in a second, and one is called balance drift check. And so this is an automated routine that ensures that your load cells zero point when there is no mass, no force on the load string, that it's not drifting over time, which would of course indicate that something could be wrong with that load cell.
So, if you do choose to enable this check, that you're going to be specifying a time interval between two checks and then a tolerance, a force value where it's an allowable delta between those two points. And so you can choose those two values. And when those time intervals occur, the user will actually get a message that if there is a specimen in the grips, to remove that specimen, and then it will have an automated check that they initiate where it will evaluate the drift that has occurred. So if the tolerance has exceeded, they're going to be required to balance that load cell. Certainly if this is something that's happening regularly in any significant manner, then there could be something inherently wrong with the load cell. So you could contact us. But this is something that's good to know where I think certain customers, they might have just a rule of thumb or maybe a simple check that they're doing informally, but this could be a formal procedure you put around checking the status of your load cell.
And periodic calibration is a little bit more simple. Basically all you're specifying if enabled is the time interval between required electronic calibrations. So many people do this again informally once a day, once a shift maybe before every single sample. But you can specify that interval, and it will not allow the user to actually run a test until the calibration has been performed. So that's our first, a little bit of a two-for-one between drift check and periodic calibration.
The next is is pretty simple. It's input bounds, but I don't know and I'm not very confident that a lot of people actually implement this very simple, useful capability. So what is it? All of our number inputs, that if you want to make sure that the user who's entering that value as they're running tests does not enter something above or below a certain value, you can simply set up these bounds. And in the act of running a test, if they do enter that, it'll tell them this is an invalid value and essentially you'll be able to prevent a test where that specimen or the test conditions, whether this I'm showing is width so dimensional values, you could have maybe temperature, humidity, any sort of number input that your operators are entering, you can assign these bounds to make sure that the test does not proceed with the value that's not acceptable.
[12:45] — Tips 3–5: Grip Pressure, Pre-Tension, Excess Tension
The next slide here shows three. So, I'm grouping three features together. They all involve gripping pressure and the act of using automatic grips. So, this isn't going to be applicable to everyone potentially like the last couple, but if you do use automatic, like automated grips such as our pneumatic side grips, which are shown in the middle here on the right-hand side, these are our pneumatic cord and yarn grips for testing fibers and cables and such. What you're about to see does require these types of automated grips and a grip controller. So in many cases there's a footswitch in play, and that certain features are going to require the integrated air kit into the controller. But I'll get to that.
So the three features again: grip pressure, pretension, excess tension. Let's start with grip pressure. It's probably the easiest to explain where in a Bluehill method, we have a grip menu. It is found in console. So there's some frame settings, some grip settings, and the very first field that you're able to specify, that if you are using an integrated air kit, that you can specify the grip pressure that will be applied to the specimen for that method. So in this case, you can see it's set to 45 PSI, that if you had a different method with a different material, you could set that to 50 PSI or 60 PSI, whatever was in the workable range of your grip. We recently released a compact hydraulic grip pump that also has this capability. So, if you're setting things to 2,000 – 3,000 PSI with that hydraulic pump, then you can do so in the same area.
And so, what is this doing? How is this helping that? You're basically just able to remove the variability associated to having the user, the operator being relied upon to manually adjust that pressure regulation test to test as it might be changing for different types of materials, different tests that you're running. That it will take that variability out of the equation.
Then the second feature is called pre-tension. So pre-tension, what does it do? That it is going to automatically close your lower grip at a specified tensile force. And this is particularly relevant for our cord and yarn-style grips. Again on the right-hand side, where a user will be wrapping the cord in the upper grip, closing it, pulling at a slight tensile force as you're wrapping around the lower grip and as you've achieved the threshold of tension that the lower grip will automatically close. Again, what is this doing? As you're testing these cords, you're removing that slack and you're putting a consistent amount of tension on the specimen prior to your pre-test or test settings.
And the last one here is excess tension. And so what does this do? This is going to automatically open your grips when the load cell sees a certain value before the test has begun. So if you want to protect your specimen from an excessive amount of force during the test — sorry, protecting the specimen from an excessive amount of force before you're starting the test, that you can specify it here.
One additional screen that I wanted to show that on our latest controllers, the 3400 and 6800 systems, that there's an Operator Protect menu that can be found in your admin settings. And this is a number of safety settings that are kind of introduced with those controllers to create a more safe user environment with our equipment. So there's things where you can specify minimum, kind of maximum jog rates, and then there's some grip controller configuration to determine the safe gripping pressure before the full test pressure is ramped up to. You can configure kind of that safer grip pressure.
But what I wanted to focus on is the grip control. And so for pre-tension specifically, that there are additional settings in Operator Protect that you will be configuring because that could be seen as an unsafe condition, where if you have a method where you have pre-tension enabled, you close the upper grip, you pull on the specimen, and the lower grip closes without the user pressing the foot switch. We need to make sure that is a known condition that is known by the system. And so in that case, you would actually be saying the grip control is, kind of the upper is closing by the footswitch, the lower is going to be a remote setting. So, just something to keep in mind that depending on your system, depending on your integrated kit, there could be different settings that you're going to be used to enable some of these capabilities. But our service team is definitely well aware of all of this, and so they can answer any questions that you might have.
[19:02] — Tips 6 and 7: Preload & Auto Balance
OK, moving on. Number six and number seven. Again, I'm going to bundle a couple of these together, so preload and auto balance. So in your test control pre-test menu, you will find a few different settings associated to things that will happen before your test starts, before you start collecting data. So you can see temperature soak. If you have a furnace or a chamber, you need to soak things — that's something you can do in pre-test.
And then you'll see preload. There's an optional over-travel condition that you can set associated to your preload. And then there's auto balance. And so what is preload doing? It's going to be removing the slack from the specimen caused by gripping the specimen itself. So what are you doing? You are essentially telling the crosshead to move at a certain rate until you reach a certain force. The settings that we recommend for preload is that you don't ever really want to exceed 1% of the expected fast maximum force of your test, and you want to use a rate, a displacement rate that's either going to be equal to or slower than your test rate.
So those are kind of the rules of thumb for your preload settings. And many times, especially if you're measuring strain, if you're using an extensometer, that hand-in-hand with reaching a certain preload is balancing your strain source's displacement so that you can start each test at 0% strain. So preload, how is that helping, that you are in a consistent manner removing slack from your specimen, and test after test after test, you're going to be able to start at a consistent rate, and auto balance is going to make sure that when you do start data collection, that you are balancing your displacement to zero.
[21:29] — Tip 8: Specimen Protect
All right, Specimen Protect. So Specimen Protect is the eighth feature we're going to review that the controller, there is a frame controller requirement for Specimen Protect. So currently our 6800 Series has Specimen Protect. Our 3400 Series does not. Previously 5900 have Specimen Protect, 3300s do not. 5500s also have Specimen Protect. So there is a dependency whether or not you're going to see this capability within the the machine's handset, which I'll show you in a minute.
But I wanted to show you the settings that are available in the test method. But before we get to that, I mean, really what is Specimen Protect? It's when the system is idle, if you're in setup, you're jogging the crosshead that when a test is not running, the crosshead will automatically by itself move marginally up or down to reduce any force that it sees as you're gripping a particular specimen. And the reason why this can be so important is especially on more rigid specimens, this really becomes something that could impact your results, in that as you grip the material, as you're putting the specimen in your grips, clamping it down, that you can subject that to bowing in compressive forces or you can even, depending on how the gripping occurs, you can put tensile forces that can actually make a difference and damage that material before you even have pressed start.
And so what Specimen Protect does is that, as you are in the act of gripping, and that moment is being put on your material by forcing your material together in a little bit of a compression or pulling it apart, that your crosshead will automatically move fractions of a millimeter up or down to relieve that load based on the threshold that you've defined. So in this case, I had set the threshold to be 10 newtons. So if it sees a force above that, it's going to move the crosshead to relieve that force. So you're going to be setting the actual force threat threshold and the responsiveness. So depending on the compliance of your, or flexibility rigidness of your material, that you're going to want to play around with the responsiveness to make sure you're getting the appropriate movement before in an appropriate amount of time.
And one reminder on this particular feature is that there is, if you go into test control into the end-of-test conditions, that there are what we call end-of-test actions. And so if you do have a 6800 Series and you are using Specimen Protect, it is typically recommended to have Specimen Protect automatically enabled once your test finishes, which puts the system in a little bit of a safer state and then also doesn't allow, doesn't force the user, the operator to remember to turn it back on as they go to grip the next specimen. And so what this looks like on our current handset is this button in the bottom left that there's a shield. So this shield is synonymous with Specimen Protect, that if it is green, that means it's currently active. If it's white, so if it were the color of say this down arrow, then it's not active. So, that's just one little reminder of how it's been integrated onto our latest handset.
[25:38] — Tip 9: Automatic Crosshead Positioning
All right, number nine. So, I wanted to start this by just showing a couple of photos. So, number nine is automatic crosshead positioning. And this is a feature that we just came out with, with the release of our 6800 systems, was the first series of systems to have this capability. But what were we trying to solve? I mean, I'm curious if anyone finds these in their labs, but certainly when we walk into a lot of our customers' sites, we tend to find lines drawn on the equipment with a Sharpie that say start here or tensile 1 starts here, tensile 2 starts here, and just have reference points so that users know where they need to drive the crosshead to start the test.
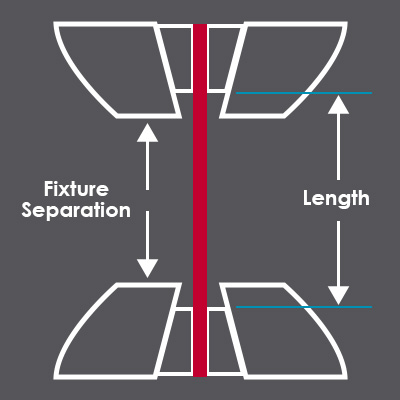
So why do they need to do this? It's because our displacement transducer is something that people can balance. And so it doesn't necessarily know where it is or when it's been balanced. And so you're driving to a reference point to be able to start at a consistent place to have a consistent grip separation for your given load string for your given test. So pretty logical, but unfortunate that this was how the majority of people are achieving that. So what does Auto Positioning do? It is saving your crosshead starting position for each test method. So it uses an absolute encoder behind the scenes to identify the actual absolute position of the crosshead at any point in time.
So it's not, this is not impacted by you balancing displacement throughout the everyday use of your system, and how it works is that just like users do today if they're about to run a test, they say, sure I want to run a test. They select the method they want to run, and typically it jumps directly into the sample, but when you have Auto Positioning active for that test method, there'll be an in-between step where you see a screen that looks exactly like this where the user is presented with an image. The image is going to be a preconfigured fixture profile that has been set up for this setup that they're about to run that's linked to this method. It's going to tell them to make sure that you're setting your limits. So, it's just always a friendly reminder to make sure that, OK, you have the right equipment, you have your mechanical limits set where they should be, and that now if you press unlock and return, your crosshead is going to move down 200.4 mm to the starting position that this method should start at. And so they'll do that, and the crosshead is going to just automatically move down to the precise position that equates to the grip separation that is required for this test.
So those fixture profiles that I'm referring to, they can be stored globally and be accessed by multiple methods, or if it is exclusive to a specific method, you can create them locally to a method. But at the end of the day, what are we doing? We're just ensuring that no matter who's walking up to this, the system to run that test, that they're starting with precisely the correct grip separation each time. And that if you historically look back at how a user is setting up that separation, you could have one operator that's incredibly meticulous and spending a minute or two with a ruler of some sort to measure out that, say, 100 millimeter grip separation, and using the jog speed and the fine jog control to set that as perfectly as possible. And then you might have another operator who does it much quicker and has maybe a wider tolerance on where they end up with that grip separation being. And so it just takes out kind of the time associated to doing that really well, but also kind of the inter-operator variability.
[30:25] — Feature 10: Pass/Fail Criteria
OK, number 10. So, this is pass/fail. It's something that we've had in Bluehill for quite some time. In the results table, I think in the last couple generations of Bluehill products, there's been the ability to set tolerances on your test results to understand if a certain value is above or below failure criteria that, we did introduce the visual component of this where you have these nice big X's and checkmarks in Bluehill Universal. And then even in a later version of Bluehill Universal, I think two years ago, we introduced the concept of a sample pass/fail.
So previously it was specimen by specimen, identifying whether or not any of the results that you've defined failure criteria for, if something has fallen above or below those bounds. And then just more recently we've introduced the criteria associated to statistics. So in this case you see a big green check because the mean value passed. It's within the defined average value for tensile strength, but specimen 2 had actually failed. So the average value was good but specimen 2 had failed. So depending on what your policies are for treating that type of sample, it's good information to have.
And more than just this exceeded one of our tolerances, one of our specs that our customers have that you also could put in warning bounds. So if you're close to exceeding that, you can define what a warning bound would be. And there's a different symbol associated to warnings, different symbol in the results table. So just good to know that there's both like absolute failures and then warnings for our pass/fail kind of feature set. And you can have it set up in the test workspace. It'll automatically give you icons in your results table. And if you do have exports, so whether it's to a PDF or to a CSV file, that there are settings associated to the visibility of those out-of-bound conditions in the results table itself. If you want to keep those or remove them, you can do that with our, in the CSV files.
[33:08] — Bonus Feature 11: Live Modulus Monitoring
OK, I have a surprise. I actually have an 11th. So there's a bonus from a recent version of Bluehill last year that we released, version 4.55, and we introduced a feature that I'd imagine that everyone here has not heard of. So it is the ability to monitor the live modulus as a test is occurring. Currently this is a capability that is isolated to our metals test type only. So that is a little bit of a condition that you only will see this option in your strain test control settings in the metals test type, which everyone has access to, but the metals test type gives you some extra calculations, gives you a couple extra ramps for test control and now has this feature.
In the future we might bring this across the board into other test types, but for the first introduction, again just for the metals test type. But what is it? It's basically monitoring the modulus, the stiffness of your material in the elastic region instantaneously during a test. And it's going to be able to notify the operator if there's some sort of out-of-tolerance condition that's occurring in that elastic region, and it can either just pop up a warning or you can have an action where it actually stops the test, and allows you to reset that test before any sort of permanent deformation occurs after yield.
And so to do so, it basically, when you're setting up that method, you of course need to turn this on. And then you will be in the specimen properties area, there's a new nominal or expected modulus value that you'd be filling out. Then you would say, what's my tolerance in the elastic region where I want potentially a message to be shown or the test to be stopped, probably going to be a little bit tighter than 50%, but that's up to you. The nominal yield stress is I believe an existing value in our metals test type, and so this is again the expected yield stress, and then you'll be saying OK, what part of the elastic region do I want this to be active? Do I want this check to be occurring? So maybe not right away, maybe not super-close to yield where I know the stiffness is going to be changing, but maybe between 25% and 50% of the yield that I want this check to occur.
And you can play an audio file. You can optionally do that. And you can optionally stop the test altogether. So typically if you're going to have some sort of wide variance of modulus, especially within different types of metals and metals tests, that I mean even anytime that you're measuring modules across a batch, if there's a huge dispersion of that, that likely something is wrong. So, it could be the grips, the gripping was incorrect, there's something wrong with the batch of material that the extensometer could be installed incorrectly, that why waste the time of that test? Why potentially destroy that specimen which could be worth hundreds of dollars when you can just stop the test and kind of take a step back. But yeah, hopefully that was, I'd imagine the one that definitely everyone did not know.
[37:15] — Q&A Session
So, OK, but that's all I have. So, we can start going through the Q&A. We have a pretty good chunk of time for me to go through questions. I haven't actually looked to see how many questions have come in. It doesn't look like too many questions have come in. So, we should be able to get through these. So I'm just going to start, before I go into the ones that were just asked live, I want to start with a couple questions that came from registration over the last couple of weeks.
So, one of them is not specifically about what we kind of had this session on, but it's a question about exporting load values at specific points, and how to do that. And I think the key piece here, and something that I've realized over the last few years of talking with customers, is that there's not a majority of people that know what our preset points are. And so I think what could be helpful is, let me pull up Bluehill, and I'm going to open up just a normal tension method. And I just want to show everyone that in our calculations, that there is in the PS something called a preset point. And the preset point allows you to grab a data point based on some sort of criteria. And once you grab that data point, you can ask for any other data associated to that point.
So what do I mean by that? So in this example, we're trying to figure out how to export a load value at a specific point. So maybe to keep it simple, I'll say displacement, that once we hit 100 mm displacement, I want to take that point. That's my preset point. I want to figure out what the load is at 100 millimeters that you can indicate on a graph if you want, up to you. You can call it whatever you want, but I just wanted to show quickly that when you go to add results, that you'll see all your calculations and the different options you have available to you. And so we have that preset point that I just made. And what do you have? You can grab anything you want at 100 that, at that 100 millimeter point. And so I could grab force at that point and now do whatever format I want. And now that's on my results table. And so for this user, if you want to export it through a PDF or CSV file, then you're kind of off to the races at that point playing around with the exporting formats. But the core ability is just knowing that you can have very simple preset points to do what you need there.
OK, the other registration question that we had got, again, it was not really relevant to some of the things I talked about, but in general he was asking about hearing about different factors and how data integrity could be impacted by changing things like your specimen geometry, so going from a flat specimen to a circular, cylindrical, or bar specimen, or if you have wildly different materials that you're testing. If you have Inconel, if you have copper, two very different materials, how should that play a role into thinking about data integrity? Also, the type of extensometer, physical extensometer, like a traditional clip-on versus a video extensometer. So there was, it was a pretty wide open question, and I think all I really wanted to say is, and I hope the beginning, kind of the initial part of this webinar, was helpful for this particular person if they tuned in, but at the end of the day, there are a lot of different considerations whether you're thinking about your geometry type, the material type, the extensometer type that you have to worry about, your frame capacity, the grips that you're using, the jaw faces that are within those grips, and of course your extensometer type. If you're measuring strain, that if you have a video extensometer versus a traditional clip-on, there's a lot of different influences at play and they come with different advantages and disadvantages. And so, I mean, there's not really an answer to the question. There's a lot of different considerations. And so, I will follow up with this person to see if they have a specific question. But it can be overwhelming sometimes to look at all the different ways your setup can impact, again, how much you trust the data coming out of the system.
OK, other questions? So these are the live ones. Is the drift check feature in older versions of the software? That is a good question. I want to say that was introduced in Bluehill Universal at some point. I don't think it was available in Bluehill 3, Bluehill 2, but I will follow up with an exact answer to that person. But I apologize, I don't I don't know when everything is introduced. But good question.
Another question: When I make a new tensile testing template, I notice two things. The test stops when five samples are reached, and the start of the test lowers and I notice a bend in dog bone sample before starting to pull in tension. This only occurs if I create it from a blank template. If I use one of our past templates, I don't get this issue. OK, so this is a good question. And I think it kind of covers a couple of the features that we were talking about.
So number one, I think I'm still sharing my screen, is that the number of tests that are kind of predefined, that if you go in Bluehill Universal all the way to the right, there's our workflow where you can define a prompted test sequence. And in this prompted test sequence, one of the things you can do is say, hey, is this going to be, is the sample size, the number of specimens going to be open for the operator? They can do as many as they want, or is it going to be predefined? And so if it's set to predefined and you had this set to five, then that would be a case where you try to, it'll basically tell you to finish that sample once you've reached that number. So I'd imagine that's what you're seeing in that case.
And then in terms of the the other part of the question about creating a bow in the material, I'd say that the two simple ways of thinking about that if you do want to check about, you do want to check your Specimen Protect settings so that, like I said before, in test control end of test maybe at some point in the method, that does work for you. Someone had said enable Specimen Protect. If you do have that capability on a, say, 6800 or 5900 system, that means as you're gripping, you're going to be kind of removing some of that compressive bow. But that's one thing, but probably more likely it's going to be the preload routine. So that again, kind of the most commonly recommended way of getting rid of slack prior to collecting data and the test starting is going to be enabling a preload specifying kind of, yeah, what rate do you want the preload, the crosshead to run at during this pre-test event. And then if you do clamp your specimen, you get a little compression on it, you want to pull it to some level of force that of course you're not balancing the force out. So you're always going to maintain that true force on the material, but you just want to make sure it's not too high because data collection hasn't started yet.
OK, another another question. How do you set the upper and lower grip travel limits? OK, so there's a couple ways to do that. You can do that physically, you can do that kind of electrically. So, the way that we show every time you open up a sample, it has someone setting your mechanical limits to make sure that your crosshead and your grips cannot go through a certain point. So there's going to be mechanical limits on the guide columns of the system that you're going to unscrew, screw to a point where that if the crosshead comes down beneath, that it'll make a contact disable the frame to prevent any further movement. So you can do that on the low end, you can do that on the top end as a mechanical stop for the crosshead, which basically is in essence the grip's travel limits.
The digital kind of the, through the software that you can set up limits for not just displacement but actually for other measurements as well that you can set up pre-test limits, so that if it exceeds or kind of goes below a certain value, then you prevent a test from starting. So this is one form of a limit that you can define for pre-test conditions of not just displacement but force, strain, what have you, and then an additional layer that's more of a system-level setting is that if you go into system settings and you go to your displacement settings that you can set up, again limits, and so this is a global setting electronic that's going to be looking at the live displacement value. So the only the thing you have to be aware of here is that this is not the absolute position. And this is going to be the displacement that you see in the live display. So someone could balance it and it could not be as reliable as the physical hard stop that you're, that the user is setting up on the guide columns themselves.
OK, other questions? There's a lot more. So, I'm going to just try to fly through these as fast as I can and then I'll follow up with people. For periodic load cell calibration, can the time of day be set? I believe it is just a time interval, not date time. Let me look at — yeah, so it is day, hour, minute, and it's simply an interval. So it's not, say, 8 a.m. every single day. But that is a good feature request, I agree. But we don't have that capability right now.
What speed should the tensile machine be set up at? So the speed, so if you're talking about jog speed, that as you're moving grips up and down, getting ready for a test, you can set up that jog speed to be whatever you want. The faster it is, the quicker you can get something done. Maybe a little bit less safe depending on who's using the equipment and what type of equipment and fixtures you have and the sensitivity of those that you don't want to run too quickly and potentially damage something. But you can set up your frame rate in terms of the jog speed when you're just setting up in Bluehill. You can also set up the return rate. So, if you do want to kind of max it out or if you want to actually tone it down from a safety standpoint of your equipment and of your users, you can do that in Bluehill. And then, of course, for your test method, that's going to be entirely up to your application. Many standards are going to define exactly the rates that are available for the different types of specimen geometries that you're testing and the results that you might be trying to capture, whether it is modulus and yield or just kind of elongation at break, there's going to be regulated rates to make sure everyone's doing it the same. But yeah, so I'd say this one's up to the application and the standard. It's not something that's universally set.
OK. Does the modulus monitoring function require the extensometer? Short answer is no, but I don't know the relevance without it. But if I go into a, typically when you're measuring modulus, I guess it depends on exactly what standard you're referring to, but most modulus measurements do require a very accurate strain measurement that is only met by extensometry, but maybe you're referring to some sort of elastomer or some elastomeric standard or something. But for this live modulus setting where I showed it before, is that in strain it's, you have this setting. But it does require you to enable this virtual kind of instantaneous modulus measurement. So if I try to do this, it's going to give me an error saying I need that measurement. So in measurements, there's a new modulus virtual measurement that's exposed in this metals method type, and this is just going to be looking at stress strain stiffness of the, I believe, of the tensile strain channel. So even in this case I don't have a extensometer set up. It's still going to do its job, to your point. You don't need an extensometer. It's just going to look at the stress and strain based on your kind of cross-sectional area, the active stress, and then the strain from, in this case, the movement of the crosshead and the initial length that you're setting here. But I'd say that's a pretty rare case where someone would be calculating modulus like that. But in here is kind of this additional nominal modulus field that is exposed in specimen properties that enables us to kind of set that these expected levels for us to not only do the instantaneous measurement, but of course evaluate against where you think the material should be.
OK, next question. Five minutes left. The responsiveness of Specimen Protect is in percent. What is the percent of a measurement of what, or what is that respect to? OK, that's a good point. I think there's there's some color here where if we, hopefully you can read this, but it's in percent. Right now it's set to 50%. Like if I change this down to 20%, what is that going to do? That's going to make it respond slower. So the responsiveness is determining how quickly the system reacts to relieve the force on a specimen. So at 1% it's reacting at the slowest rate. And so I'd say maybe it's not the best answer, but this is basically slow, slowest to fastest. I think it's easier to do kind of a slow to fastest rather than defining it to be a set rate that you're telling the crosshead to move to adjust, because it is kind of a profile that's actually happening in real life. So we just do this kind of 0 to 100 scale. I'm sure there's a little bit more color in the help file, so if you were interested, there's always some good content in our help file.
Next question. Is the pass/fail tolerance something saved with the test template, or can you enter it in pre-test? Oh, OK. You can do both. So you can either, let's grab that preset point again really quickly. Well, actually no, even easier, press a peak max. So max force, maybe I want to add some failure criteria for max force. So what do you do there? I'm going to grab max force. When you put it onto your results table, you're going to see that you have for that particular result your warning bounds and failure bounds. And so you could put in failure bounds, and what do you see? You see you can put in an actual number. So I could say, whatever, 100 kN to 95 kN are my bounds for what this material should break at. Those are just fixed numbers that I'm saving to this method, right? But what you could do is you can use Expression Builder to link that to be a user input value or something that you can maybe even link to a choice. So you could have a number input that is called your, whatever, max force upper limit, right? And then you can make this a force unit group. Doesn't really matter what the default value is. And what are we going to do with this? You can put this on your operator inputs. So you grab your specimen number input max force. Bam. Now someone can define what that is. And then number two is you go back to your results table, back to that max force, and say, no I don't want this to be fixed at 100. I want to grab my specimen number input. That is going to be dynamically set. And then that is going to be how it's going to be evaluated. So right now it's saying, hey Dan, your dynamic number doesn't match with the lower bound. So, it's going to give me an error, but that is exactly how you would do it either way.
All right. I think Nick's going to want me to end, but there is a bunch of questions, so I'll try to do my best to get to other ones afterward, but until then, thank you for tuning in.
All right, great job, Dan, and yes, lots of questions. So, if you still have some questions that are coming in, I'm going to summarize those and get those over to Dan so he makes sure you know he can follow up with you. Just a reminder, I did see some questions about this being recorded, so at the end of this, I'm going to throw it up into YouTube and I'm also going to email everybody a link to that. So, in case you need to go back and rewatch anything, you have that.
And then I'm going to make a plug here: If you're interested in additional learning opportunities like this webinar, I encourage you to take a look at our new plastics testing webinar series. It's called From Formulation to Finished Components. The series explores best practices for testing plastics across different stages of development in manufacturing, and registration is available on our website now, and I'm going to drop a link into the chat where you can check out the landing page where it's got, there's five different sessions. So, if there's something that works that fits what you're interested in, go and check it out, get registered.
And then lastly, once this webinar ends, a survey should appear on your screen. We would really appreciate your thoughts on this presentation today. So, with that said, I just want to say thanks to Dan for presenting today and certainly thanks to you for attending. Really appreciate you joining us. Take care, everybody.